 Translation missing: en.accessibility.skip_to_text


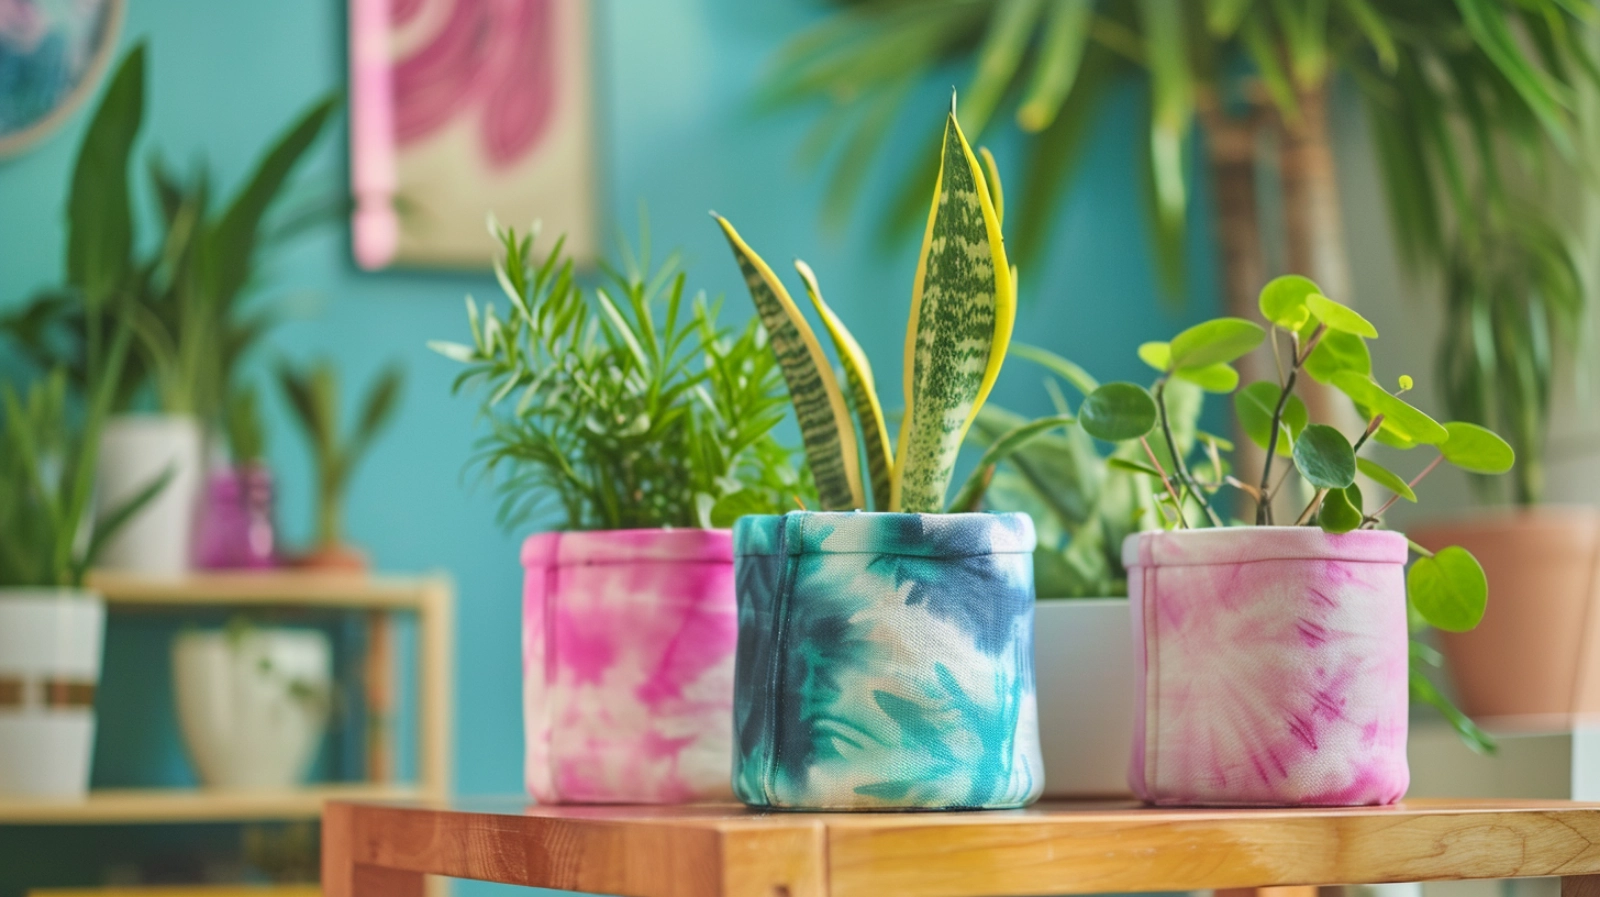
Are you looking to add a touch of greenery to your home while showcasing your creative flair? A DIY fabric plant holder is the perfect project for you! Not only does it provide a stylish way to display your favorite plants, but it also allows you to personalize your decor with various fabrics and designs.
Today, we'll learn how to make a unique tie-dyed fabric plant holder. This fun and simple project will elevate your indoor gardening game and bring a distinctive, handmade charm to any space. Let’s get started!
Key Takeaways
- Select Fabric: Opt for breathable and tough materials.
- Tie-Dye (Optional): Add color and patterns to your fabric.
- Measure & Cut: Cut pieces for the sides and base of the planter.
- Sew: Hem the top, sew the side seams, and attach the base.
- Add Handles (Optional): For portability, attach fabric or rope handles.
- Finish: Trim threads, decorate, and ensure a snug fit for your plant pot.
Gather the Materials Needed
Before learning the tutorial, you'll need several essential materials:
- Fabric: Canvas, denim, or any thick, durable fabric.
- Tie-dye kits
- Sewing machine (or needle and thread for hand sewing).
- Scissors
- Measuring tape or ruler
- Pins or clips
- Thread: Match it to the color of your fabric or use contrasting thread for a decorative effect.
- Iron (optional but recommended for neat edges).
- Lining material: Waterproof fabric or plastic (for water resistance, optional).
DIY Fabric Planters: Step-by-Step Instructions
Ready to bring a touch of creativity to your home decor? Let’s dive into making DIY fabric planters!
Step 1: Choose the Right Fabric
Start by selecting a fabric that is tough and breathable. Landscaping fabric works exceptionally well because it allows water and air to pass through while retaining soil. If you prefer colorful or patterned planters, opt for canvas or felt.
Step 2: Tie-Dye the Fabric (Optional)
For unique, colorful planters, tie-dye your fabric before cutting and sewing. Follow these steps:
- Wash the fabric to remove any sizing or chemicals.
- Fold or twist the fabric into the desired tie-dye pattern (spirals, stripes, or random bunches). Secure it with rubber bands.
- Apply fabric dye according to the instructions on the packaging. Use multiple colors for a vibrant effect.
- Let the dye set for the recommended time, then rinse until the water runs clear.
- Allow the fabric to dry completely before moving on to the next step.
Step 3: Measure and Cut the Fabric
Measure the height and diameter of your plant pot to decide on the size of your planter. Then, cut two pieces of fabric:
- A rectangle for the sides (Height: add 2 inches to the pot's height; Width: equal to the pot's circumference plus 1 inch for seam allowance).
- A circle for the base (Diameter: equal to the pot's diameter plus 1 inch for seam allowance).
If you're adding lining, cut the same pieces in the lining fabric.
Step 4: Sew the Side Seam
Before sewing the side seam, hem the top edge of the fabric. Fold down 1/2 inch along the top edge of the rectangular piece and iron it flat. Fold again and sew to create a clean hem.
Next, fold the rectangular fabric in half with the right sides facing each other. Pin or clip along the vertical edge to form a tube shape.
Stitch along the pinned edge with a 1/2-inch seam allowance. Turn the tube right side out and iron flat if needed.
Repeat this process for the lining fabric, if applicable.
Step 5: Attach the Base
Take the circular base piece and pin it to one end of the tube. Align the edges so that the right sides are facing each other.
Sew around the edge with a 1/2-inch seam allowance. Go slowly and adjust as needed to prevent wrinkles.
Step 6: Create Handles (Optional)
If you’d like your planter to be portable, attach handles. Cut two strips of fabric or use sturdy rope for this purpose.
Securely sew them onto the top edges of the planter, ensuring they can support the weight of soil and plants.
Step 7: Finishing Touches
With the main structure complete, it's time to refine the details and perfect your DIY fabric planter.
- Trim any stray threads and check for loose seams.
- If you'd like, decorate the outside with embroidery, fabric paint, or patches.
- Test fit your plant pot to ensure it fits snugly.
So, your unique houseplant holder is complete. Place it strategically to improve your home decor!
Conclusion
Creating fabric plant holders is a fun project that allows you to combine practicality with creativity. With some basic sewing skills and a bit of time, you’ll have custom-made plant holders that brighten up your space and show off your personal style!
Happy crafting!
Learn more sewing projects on the Longan Craft Blog, and dive into the fabric world with Longan Craft!
FAQs
How to Make a Cloth Planter?
Cut two 18x30" fabric rectangles, sew them together, and fold the sides to form a cylinder. Add a 10¼" circular bottom, install eyelets along the folded top edge, and don't forget to waterproof your planter.
What Fabric Is Used for Fabric Pots?
Your best options are landscape fabric, cotton canvas, and polyester upholstery fabric. For ideal results, select landscape fabric for breathability, canvas for durability, or polyester for weather resistance.
Do You Need Drainage Holes in Fabric Pots?
You don't typically need drainage holes in fabric pots since their porous material allows natural water seepage. The breathable fabric efficiently regulates moisture levels, though you can add holes for plants requiring exceptional drainage.
0 comments